
A seat cover can fit correctly yet send the wrong visual signal. If I ignore film opacity, staff may dislike the result after delivery.
I choose clear disposable car seat covers when upholstery visibility and quick visual inspection matter. I choose milky-white covers when I want protection to look more obvious or printed identification to stand out. I approve either option only after comparing installed samples under actual service-bay lighting.
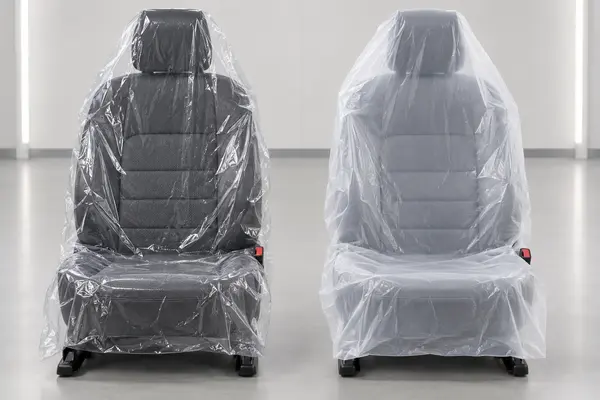
The color choice looks simple, but it affects presentation, inspection, printing, and repeat ordering. I use one controlled trial so appearance does not hide a different material problem.
Which Film Appearance Fits My Service Workflow?
A catalog thumbnail makes clear and milky-white film look similar. Once installed, lighting and seat color can make the difference much stronger.
I start with the workflow. I use clear film when I want the original upholstery easy to see. I use milky-white film when I want installed protection to be more visible. I do not treat either appearance as proof of better strength, cleanliness, or fit.
I Match Opacity to the Job, Not a General Label
I first ask who needs to notice the cover. A technician may want to see the seat surface, controls, or anything trapped below the film. A service adviser may want the protection to be obvious.
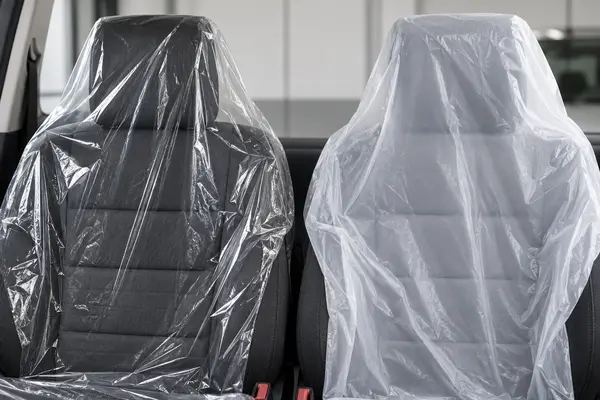
Clear film keeps more upholstery color and pattern visible. I find this useful when presentation or inspection matters. However, clear film can be less obvious on a light seat or under bright reflections. I check it from several normal viewing angles.
Milky-white film softens the upholstery view and often makes the protective layer easier to notice. It may give printing more visual separation, but I still approve a printed sample. I never assume white film is thicker. Opacity and measured thickness are separate.
| My service priority | My starting option | What I verify on the vehicle |
|---|---|---|
| I want the upholstery easy to see | Clear film | I check visibility, glare, folds, and exposed areas |
| I want protection to look obvious | Milky-white film | I check appearance from normal customer viewpoints |
| I use printed identification | Milky-white may help | I approve contrast, ink adhesion, and legibility on a real sample |
| I need easy inspection below the film | Clear film | I confirm that wrinkles do not hide key areas |
How Do I Compare Clear and Milky-White Samples Fairly?
Two samples can differ in thickness, texture, size, or folding. If I compare them as received, I may blame opacity for an unrelated difference.
I compare covers with the same dimensions, thickness basis, texture, construction, opening, and packing condition. I install both on the same seat model, under the same lighting, with the same method. I then record visibility, glare, coverage, handling, and removal.
I Use an Installed A/B Trial
I use one clean light seat and one clean dark seat. I photograph each before installation from fixed positions. I install both covers without excessive stretching and keep the door position and lighting unchanged.
I inspect the headrest, backrest, cushion, bolsters, and controls. For clear film, I note whether glare or wrinkles reduce the view. For milky-white film, I note whether it hides too much upholstery. I also check whether uncovered areas remain easy to spot.
I have a normal user enter and leave the seat. I record movement and bunching without assigning those results to color. If handling differs, I confirm that gauge, embossing, size, and construction are equal.
| My trial step | What I keep equal | What I record |
|---|---|---|
| I install each cover | Method, operator, seat position | I record orientation and full coverage |
| I view from normal angles | Door and light positions | I record clarity, opacity, reflections, and folds |
| I enter and exit | User action and duration | I record movement without assigning it to color alone |
| I remove the cover | Removal method | I record tears, transfer, and visible residue |
| I repeat the trial | Light and dark seats | I record whether the decision changes by interior color |
I keep photographs and observations with the approved sample. “Clear” or “white” alone is not enough because those words can cover different opacity levels.
Which Variables Must I Separate from Film Opacity?
An attractive sample can still be the wrong size or construction. If I approve by appearance alone, routine use can reveal problems too late.
I treat opacity as one controlled field. I specify material, dimensions, thickness with units, texture, layer construction, seams, opening, folds, perforations, print, and pack format separately. I compare clear and milky-white film only after those fields match.
I Prevent One Choice from Hiding Another
I write “clear transparent” or “milky-white translucent” and attach an approved sample or visual reference. I reject vague terms such as natural, frosted, pearl, or standard white until I see and approve the result.
Opacity does not tell me film uniformity, thickness, strength, slip, static behavior, or cleanliness. I use a raw-material selection process, and I do not use recycled production waste as substitute material. I still test the actual cover instead of using color as a shortcut.
I keep texture and construction separate. My guides to embossed or smooth seat covers and single-layer or dual-layer seat covers cover those decisions. Opacity replaces neither one.
| My specification field | My clear requirement | Why I keep it separate |
|---|---|---|
| Appearance | I state clear transparent or milky-white translucent | I avoid a vague color name |
| Approved reference | I identify a dated sample or controlled image | I align the expected opacity |
| Thickness | I state units and tolerance | I avoid using whiteness as a thickness claim |
| Finished dimensions | I define the measurement method | I keep fit independent from appearance |
| Surface and layers | I state smooth or embossed, single or dual | I prevent a mixed comparison |
| I state artwork, color, position, and approval | I confirm contrast on the selected film |
I also use my seat-cover size and thickness specification so opacity stays separate from fit and gauge.
What Should I Put in a Bulk-Order Approval Plan?
A good sample can become a poor repeat order when the purchase document says only “white seat cover.” Small opacity changes can then surprise the buyer.
I give each approved appearance its own item code. I attach the sample reference, visual description, controlled specifications, artwork approval, pack details, and inspection method. Before shipment, I compare production samples with the approved reference under consistent lighting and record the decision.
I Turn a Visual Preference into a Repeatable Order
I start with the exact application: temporary protection for automotive front seats during the agreed workflow. I state the selected appearance and why clear and milky-white items are not automatic substitutes.
For a printed cover, I approve artwork on the final film. I check size, location, orientation, color, and readability after fitting. A flat swatch alone does not show how folds and seat contours affect the result.
I define a pre-shipment comparison method with the approved sample, a neutral background, similar lighting, and one viewing distance. When agreed, I review a production-lot sample and record any accepted variation.
Finally, I align counts at every packing level. I state pieces per roll or bag, inner and carton counts, label wording, and item code. I focus on order quantity accuracy and export-risk reduction because volume makes small errors expensive.
| My approval record | What I include | My next action if it differs |
|---|---|---|
| Item identity | I include appearance, dimensions, construction, and item code | I stop substitution between clear and milky-white versions |
| Physical reference | I include an approved and dated sample | I compare under controlled light |
| Packing sheet | I include unit and carton counts | I reconcile quantities before dispatch |
| Production check | I include film appearance and core specifications | I review the cause before acceptance |
| Reorder file | I include photos, sample reference, and revision date | I use the latest approved version |
I then request a quotation for one exact item instead of a generic disposable seat cover. My supplier and receiving team work from the same target.
I choose opacity for the workflow, prove it with an installed comparison, and lock the decision into the sample, item code, specification, and inspection record.