
When a wool car mat separates at the backing, a clean sample can become a return, a fit complaint, or a costly rework order.
I test backing adhesion before approving a wool car mat bulk order by flexing corners, making controlled peel checks, inspecting the bond line, and comparing results across samples. I record the failure mode instead of relying on appearance alone.
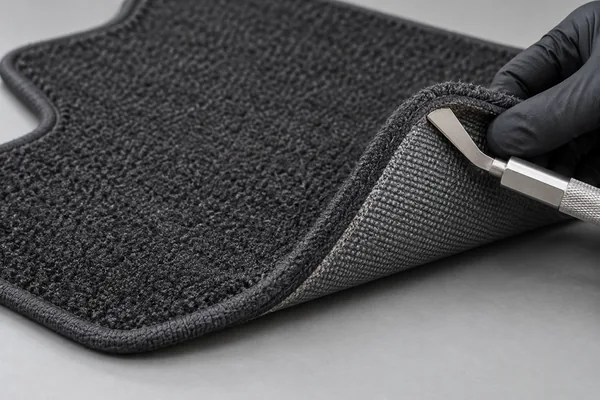
I use this process when I review a new wool car mat supplier or a revised backing construction. The surface may look full and soft while the underside bond is weak. I want a simple, repeatable check that a distributor, importer, or OEM buyer can perform before committing to production.
How should I define a backing-adhesion inspection for wool car mats?
A vague request for a “strong backing” leaves the supplier and buyer with different expectations. That gap becomes difficult to resolve after shipment.
I define the inspection as a set of visual, handling, and controlled separation checks on the wool face, backing layer, edge, and any bonded insert. I compare every result with the approved sample and written specification.
I separate the bond points before I test
I first identify what is actually being bonded. A wool car mat can have a face layer, a secondary backing, an anti-slip treatment, a stitched edge, and molded or bonded retention areas. I do not call a stitching problem a backing failure, and I do not treat a surface coating as a substitute for a stable backing layer.
| Area I inspect | What I look for | Why I record it |
|---|---|---|
| Face-to-backing interface | Gaps, lifting, bubbles, or visible separation | Shows whether the main layers stay together |
| Backing texture | Even coverage and consistent pattern | Reveals thin or uncoated areas |
| Edge and corner | Lifted edge, loose binding, or exposed face fibers | Corners receive repeated handling stress |
| Retention area | Firm attachment around a clip or opening | Local stress can start a larger failure |
I use the approved sample as the reference
I keep one signed or otherwise identified reference sample for each construction. I note the face material, backing type, color, edge finish, dimensions, and any retention feature. I photograph the front and back before testing so that later discussions use the same visual reference.
I mark locations before separation checks
I mark a corner, a long edge, the center area, and any shaped transition. I then use the same locations on every sample. This prevents me from selecting only the strongest area and gives the supplier a clear position to review if one zone fails.
Which simple checks can I perform before a laboratory test?
Skipping basic checks allows obvious weak spots to pass into expensive testing. I start with low-cost handling checks that reveal uneven bonding without pretending they replace a defined laboratory method.
I use a visual sweep, corner flex, edge lift observation, and a controlled manual peel check. I stop when I see fiber tearing, backing separation, adhesive transfer, or a sudden change in resistance, and I record exactly what happened.
I begin with a slow flex check
I bend the mat face-up and backing-up along the same line. I look for a clean fold, whitening, cracking, bubbles, or a line that opens between layers. I repeat the flex at a corner because corners often expose weak coverage sooner than the center.
| Check | My method | Acceptable observation |
|---|---|---|
| Face-up flex | Bend gradually without twisting | No visible opening or crack line |
| Backing-up flex | Bend until the backing follows the face | No sudden lift or sound of separation |
| Corner flex | Repeat at two corners | Edge remains closed and stable |
| Reverse roll | Roll around a broad, clean cylinder | No permanent split after release |
I make a controlled peel observation
I do not pull randomly or use a dramatic force claim. I lift a small, pre-marked edge with a blunt tool or gloved fingers and apply slow, steady movement. I watch whether the face fibers tear, the backing separates as a sheet, or the bond releases cleanly. I photograph the first visible failure and stop the check at a consistent point.
I distinguish cohesive and adhesive failure
I describe the failure in plain terms. Cohesive failure means the material itself tears or breaks. Adhesive failure means the interface opens cleanly and one surface remains mostly intact. I also note mixed failure, where a section holds while a neighboring section releases. That pattern may indicate uneven coating, pressure, temperature, or material contact during production.
How should I compare backing adhesion across a supplier sample set?
A single sample can hide process variation. I compare multiple pieces, sizes, and production points so that I can separate a one-off defect from a repeatable construction problem.
I set a sampling plan before the supplier sends production samples. I label each piece with supplier code, sample date, construction, and test location. I then compare the failure mode and visual condition, not only a pass-or-fail phrase.
I use a decision table instead of a vague score
| Result I see | My interpretation | My next action |
|---|---|---|
| No lift in all marked areas | Bond appears stable in the basic check | Continue to dimensional and fit review |
| Small local lift at one edge | Possible local coverage or edge issue | Ask for a replacement sample and cause review |
| Repeated clean interface release | Adhesive or process bond is weak | Hold approval and request construction evidence |
| Face fibers tear before interface opens | Bond is stronger than the face at that point | Record as a positive observation, not a guarantee |
| Different behavior by size | Process or handling may vary by format | Review each size as a separate item |
I keep the comparison fair
I use the same room condition, handling sequence, tool, pull direction, and observation points. If the supplier changes the backing, coating, edge binding, or retention insert, I request a new reference sample.
I connect adhesion to fit and use
Backing adhesion is not an isolated cosmetic issue. A separating backing can change thickness, curl, edge position, or the way a retention feature sits. I place the sample on the intended vehicle pattern or a confirmed fit template after the basic bond checks. I look for raised corners, shifting, and interference near pedals or retaining points. I do not claim a mat is safe or compliant from a visual check alone; I record the inspection as a purchasing control.
What should I put in the purchase specification and inspection report?
Without a written record, a backing dispute becomes a memory contest. I convert my inspection into a short specification that purchasing, quality, and the supplier can read the same way.
I list the approved construction, sample identity, inspection points, failure descriptions, photo references, and release decision. I also state what requires re-approval instead of allowing silent substitutions.
I write requirements that a buyer can verify
| Specification line | Example of my wording |
|---|---|
| Construction | Wool face with the approved backing construction shown in reference sample A |
| Visual condition | No visible bubbles, open interface, exposed unbonded zone, or lifted edge at marked points |
| Handling check | Corner flex and reverse-roll observation completed using the agreed sequence |
| Sample identity | Supplier code, date, size, color, and revision recorded |
| Change control | Any backing, coating, edge, or retention change requires a new approval sample |
| Evidence | Photos show the same marked locations before and after inspection |
I report facts before conclusions
My report starts with what I saw: “interface opened at the left rear corner after slow flex,” or “backing remained attached while face fibers tore.” I then state the decision: approved for the next sample stage, hold for corrective sample, or rejected for this construction. This order keeps the report useful even when different teams disagree about the cause.
I include a practical next action
I ask the supplier to return a corrected sample with the revision clearly marked. For a large order, I request confirmation that the approved construction and packing method will be used for production. I focus on stable quality, order quantity accuracy, fair value, and export-risk reduction, while keeping claims limited to what the supplier can document.
I use a raw-material selection process and do not use recycled production waste as a substitute material. That position supports consistent purchasing decisions, but I still require the actual sample and inspection record to prove that the delivered construction matches the approved one.
I can approve a wool car mat backing only when the bond behavior, edge condition, fit, and records agree. I do not let a soft surface hide a weak underside.